Showing posts with label modeling. Show all posts

Tuesday, July 21, 2009

Poor man's modeling - Neb kit hose hack: Redux

Remember my Neb kit hose hack post last year (August, 2008), which was part of my Poor Man's Modeling series?

I didn't quite finish it, did I?

Anyway, resting after a sumptuous dinner-date with my fiancee last night wasn't really an option. Too much calories were taken in, and I had to burn some of them. Besides, co-members from a local GunPla forum got a bit interested in my pseudo-compressor of a nebulizer.

Let's get things underway, shall we?

First off, the materials. You need the following lest you decide to make the entire system out of paper mache:

A. A nebulizer kit hose (two of them, actually... I'll explain why you need two in the latter part.) These come relatively cheap from your neighborhood drugstores. You can buy the ones for adults, or the ones for infants. It really doesn't matter. On second thought, get the one for adults. You can use the mask as an alternative when you are doing the dirty deed -- airbrushing... what were you thinking? Anyway, each costs around Php100.00 a pop. If possible, get the hose without inner ridges.

B. GSI Creos' One-Touch Plug for Mr. One-Touch Hose 1/8 S. These plugs aren't really necessary, but if you want your hoses to fit on your airbrush without them popping off from time to time, you might want to consider 'em. By the way, I'm using a Tamiya Spray Work HG airbrush and these plugs are the ones that work with it. If you've got a different AB, go to your favorite hobby store and get the plugs that work with YOUR airbrush. Don't come running back to me, crying, and saying that the plugs won't work. They come in two pieces per pack... I don't know why, but they just do. If you don't need the extra plug, sell it to a geeky friend. Say that it came from the Apollo rocket, or something important. Oh yeah, I got mine for around Php650.00 from STC in V-Mall, Greenhills.

C. Bleeder valves. They are the ones used for aquariums to redirect/lessen the air going into your fishes' domain. You can make the bleeder valves work by turning the small levers. These valves can range from Php50.00 to Php120.00 each. Some has got two bleeder valves, while others can have three or four. They are not really required, but it's nice to have one around just in case you want to decrease the air volume going into your airbrush for detailing work. I don't use them. Really. I just bought one because I thought I needed it. I might someday. I was a boy scout. 'Nuff said.

D. A pair of scissors, or cutters... or blades. Any cutting tool will do. If two slabs of granite can cut cleanly through your neb kit hose, then fine.

E. Silicone or epoxy... some type of sealant. I used silicone for my hose.

Okay, now that we've put the requirements out of the way, it's time to hack that hose.

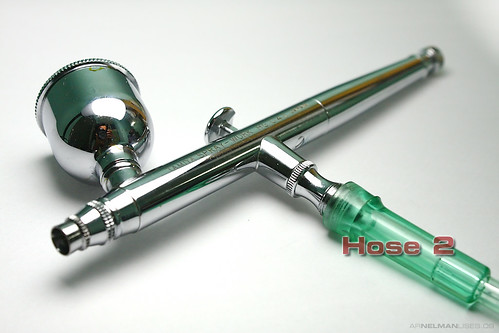
1. This is basically the nebulizer kit hose with the attachment for holding the nebule -- the nebule tank. Hose 1 is attached normally, while Hose 2 is attached to the part where the face mask is supposed to go. Fix Hose 2 in place by using the silicone... lots of it. In short, be generous with the application of the sealant. Let the sealant dry to bind the the pieces.

Nebulizer kit hack for airbrushing
Notice the splatters of paint on the tank? ^_^

2. If you do not have the GSI Creos' One-Touch Plug for Mr. One-Touch Hose 1/8 S, this will be the penultimate step for you. Otherwise, proceed to Step 4.
Attach the other end of Hose 1 to the nebulizer. You might need... I guess the proper phrase would be -- you WILL need to force the end of the hose to your airbrush. It may take a bit of elbow grease, but it will fit. Now, this isn't exactly what you may call a snug one, but it's the only thing you can do without the GSI plugs. I encountered a few times wherein the hose kept on popping out with this setup, so the plugs are a welcome addition.

Nebulizer kit hack for airbrushing

3. Attach the other end of Hose 2 to your airbrush. Proceed to Step 8.

4. You should have reached this step if you've got the GSI plugs. If not, go back to Step 2. Cut the other end of Hose 2 (the one you didn't seal to the nebule holder) with your granite slabs, er, scissors.

Nebulizer kit hack for airbrushing

5. Get one of the GSI plugs.

Nebulizer kit hack for airbrushing

6. Attach it to your airbrush.

Nebulizer kit hack for airbrushing
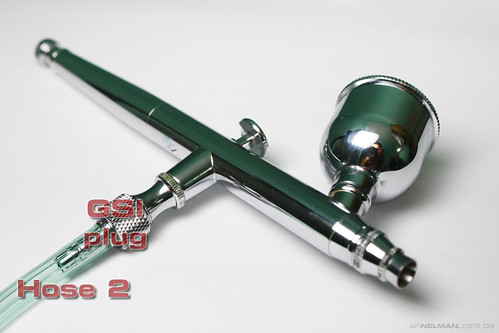
The Tamiya Spray Work HG airbrush and a GSI plug

Nebulizer kit hack for airbrushing
The GSI plug attached to the Tamiya Spray Work HG airbrush

7. Attach the end of Hose 2 (which should now be cut) to the GSI plug. If the inner walls of your hose has got ridges, the air coming out of the nebulizer will leak. You can remedy this by tying Twist Ties to clamp the hose tightly to the plug.

Nebulizer kit hack for airbrushing

8. You're done! But wait... in the case that too much air volume is rushing out of the nebulizer, you can do this final step to bleed some air out. This is one part in the Poor-man's-GunPla series, remember? We do not have enough moolah for air regulators. Cut anywhere along Hose 2. I would suggest to cut near the nebule holder so the length of the hose wouldn't be compromised in case you want to chicken out and not use the bleeder valves anymore. Insert the bleeder valve between the 2 pieces of Hose 2.

Nebulizer kit hack for airbrushing
The bleeder valve installed

NOW you're done! Happy airbrushing!

Notes of further confusion:

1. You really need only one piece of hose to make this work. However, you will notice that as you go about airbrushing kit pieces of your precious PG Strike a bit longer, condensation will appear inside your hose. That's where the nebule holder comes in very handy. It acts as some sort of water trap. It is best if you put a piece (or two) of cotton balls in it (nebule holder) to be sure that water (condensation) will not ride up to your airbrush.

2. The transparent hoses make it easier to see if some sort of condensation (again, water) appears inside your hose.

3. This hack would work with either single-action or double-action airbrushes. However, as you may very well know, the dual-action functionality of, well, dual-action airbrushes, are useless without them being connected to air tanks

Click here to see the rest of the Poor Man's GunPla/Modeling series.

Addition:

If someone else is using the nebulizer (most likely for health treatments like asthma) it would be best if you cover the neb unit when you are airbrushing. This is needed so that stray paint wouldn't stick to the unit and make it look like a graffiti wall.

Tuesday, November 18, 2008

DIY series: Gundam v-fin sharpening

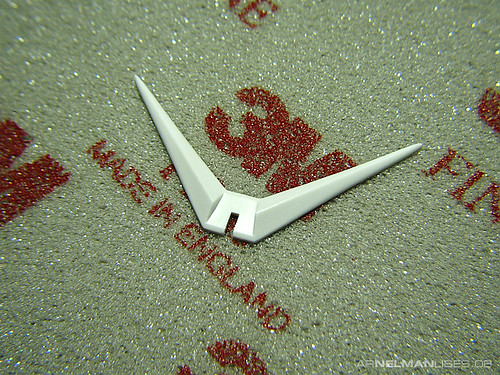
Here's how I do it... v-fin sharpening -- the down and dirty way.

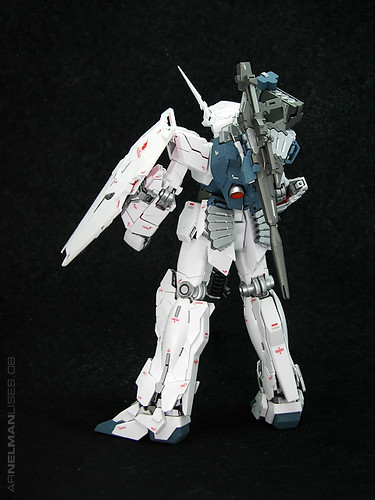
I used this process for the horn on my Unicorn Gundam, however, I wasn't able to put up an entry on how I did it.

Ready?Mythical mystical beastMy Unicorn Gundam, prior to sharpening its horn. Notice how un-Unicorn it looks like with the horn not sharpened? Ugh!

Here's the RX-0 with its horn sharpened --

RX-0 Unicorn GundamRX-0 Unicorn GundamThere... I think that's a bit better, right?

Ok, here's what you need --

1. A sanding sponge. I used 3M's fine-grit sanding sponge for the purpose.
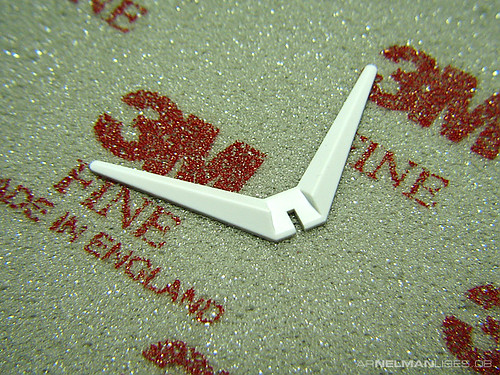
2. The v-fin, of course! For this sample, I used my SD RX-78-2's v-fin.

DIY - Sharpening v-fins 1The SD RX-78-2's v-fin and 3M fine-grit sanding sponge.

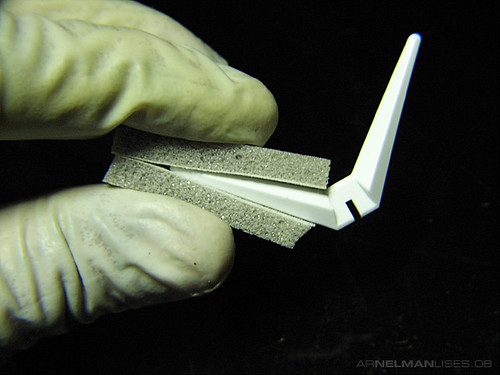
DIY - Sharpening v-fins 2The sponge sandwich. ^_^

Cut two small pieces off the sponge and sandwich the v-fin between them. Sand away by moving the v-fin in and out of the "sponge sandwich". Yup, in and out, push and pull.

DIY - Sharpening v-fins 3The left fin is now sharpened compared to the untouched fin on the right.

Be careful, though, as things can easily get out of hand while you're sanding the v-fin. You might wanna stop halfway through the sharpening process and use some finesse to fine-tune the shape of the fin and its tip. Slowly, but surely, does the trick.

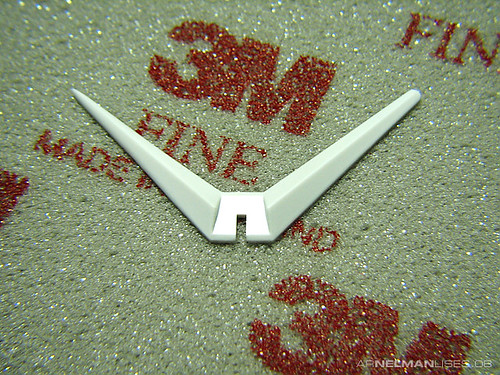
DIY - Sharpening v-fins 4
Here's the final outcome, with both fins sharpened. As you may notice, I'm not quite finished with the right fin yet... I was too excited to take a pic! ^_^

There you have it, the down and dirty way of sharpening your Gundam's v-fin.

Saturday, September 13, 2008

Poor man's Gunpla - Scribing panel lines

Something new comes up every single day... and now, I'm blogging even on weekends. I'm starting to like this blog thingie. It also helps if you've got a beer in hand and Doritos on the other... which I'm sharing with my pet Shih Tzu -- Sassy.

As I've said, something new comes up everyday. This afternoon, I tried my hand at scribing panel lines on my current work-in-progress, the MG Strike Rouge. I only have the faintest idea on how to go about the process. All I know is one needs a line scriber (which I don't have), thick adhesive tapes as guides (which I don't have), and some patience (oooh, I have lotsa those!) May the Gunpla gods have mercy on me on my first try.

I've got in my hand my first can of beer. San Miguel Beer Pale Pilsen to be exact.

I want my MG Strike Rouge to be a bit different from the other Strike Rouges that have been built. If you've been following my previous posts for some time, you would know by now why that is the case... and I would never tire of saying it -- Cagalli's MS is my favorite.

I am quite a brave chap... or probably a stupid one at that. I didn't practice scribing on trees/sprues/runners or spare parts... I'd have none of that. Instead, I went ahead and did it on my Rouge. If something goes wrong, there's always Tamiya putty. ^_^

On to the task at hand. First of all, I needed a plastic line scriber (which I don't have) for scribing the part -- a piece of armour on the Rouge's forearm. I used my X-acto knife for this purpose. I replaced the #11 blade with a spanking new one. My lack of a line scriber and the use of my X-acto knife makes it official -- this post should be a part of my "Poor man's Gunpla" collection.

Now I needed a thick adhesive tape. You know, those Dymo self-adhesive labeling tapes? The ones where you can emboss your name onto? Yes, the thick ones... and yes, I don't have 'em too... I just used Tamiya masking tapes today... although I will get those Dymo tapes soon.

I didn't have a hard time imagining the design of the extra panel lines. I looked into the perfect grade version of the Strike/Strike Rouge for inspiration. I've always adored the design of the PG Strikes, so that's where I started.

Step 1: Nothing special on the following image, I just used a pencil to outline the panel line I am going to scribe.


Step 2: I used Tamiya's masking tape as guides for the blades of my X-acto knife. Gingerly scribe lines on to the part using the back of the knife. There's no need to rush things now. It is better to run the blade tens of times over that part rather than use brute force. You're not trying gut the part you know. Think of yourself as a graceful, well, grave digger. ^_^ You need not remove 6 feet of earth all in one digging, right?


After scribing the guide lines, you can remove the tapes and proceed to deepen the panel lines. The tapes would just be a hindrance once you are in the stage of deepening the lines. If you find yourself making wayward lines, don't worry, we'll take care of that later.


Step 3: After digging the grave, err, scribing the line. Use a grit-800 sandpaper to clean up the new panel line and to remove the wayward strokes of your knife. In my case, I used 3M's Ultrafine sanding sponge for the job. Here's how it looked like after the clean-up. Not bad eh?


I'm now on my third can of beer... damn, I'm too slow tonight!

For a little comparison, the scribed part is on the left while the unscribed one is on the right.


For good measure and an attempt to be faithful to the Evolve design (even though in panel lines only), I added more panel lines to the armour.


That's it! I survived my first try at scribing panel lines! Now you know why I'm drinking! ^_^

The only downside to this is that it takes up sooooo much time! I think it took me a couple of hours (pardon the newbie, please) to scribe that piece of armour.

I'm now on my fourth beer and it's time to wrap up this thing.

It's gonna be a long road ahead for me and my Rouge... and we'll be there at the end.

Monday, August 11, 2008

Upskirt

Here's a small work-in-progress, after weeks of airbrushing the internals... why does it take me so long? Don't ask. ^_^


I'm giving you three guesses to get this Gundam's name.

The paint used were Chrome Silver and Gun Metal, all enamels from Tamiya.

For the boosters (well, they can't be seen much in this image), I used Tamiya Acrylics... namely -- Yellow, Orange, and Red.

Decal work is what I'm currently into right now for this model, so I guess it'll take around a week or so before I get the body done... yes I know... I'm such a slow-poke... buy hey, I gotta work in order to get kits like this, right?

After which I can then proceed with the weapons and the shield.

On a final note, remember my post about the glittery stuff in Tamiya Acrylics? As I've mentioned, the enamel version of Tamiya's Chrome Silver doesn't have any glittery effect. Can you see any in the image posted above?

Monday, August 04, 2008

Of cement and glitters

I broke part of the Exia's shield sometime ago (March 9, 2008), I think. I don't know... maybe I was just too lazy and too careless when I tried to pry it out.

Praaacck! My fiancee, who was a few yards away heard it and said, "Awwww... something broke, right?" I gave no response as she followed with, "There goes the kit I gave you." with a smile on her face.

Here's the shield thingie that broke --


It's a good thing that I've got Tamiya Cement around. It's perfect when you screw up and go Herculean on something like your styrene kits. It bonds styrene by basically melting the part that it touches.

I can only vouch for it working properly on styrene, though. It wouldn't work on ABS plastic. Don't ask. Tamiya Cement just doesn't work that well (if at all) with ABS plastic.

You can use LCA or super glue, of course. Admittedly, LCA would bond the severed parts like crazy. The problem with it, however, is that it would also render the affected plastic VERY brittle. You could end up with more problems than the one you've started with.

Here's how Tamiya Cement goes -- brush the cement thinly on the affected areas and put them together again by squeezing. If you see excess cement oozing with what seems like melting plastic, don't fret. It's the way the cement should work.

Put the plastic in a safe place and leave it there for, say, 12 hours. Too much curing time is definitely better than having it cure incompletely. In my case, I checked on it a full 24 hours later.

Here's how it looked after applying the paint and squeezing the parts --


Notice the excess cement? Now, it's time for some elbow grease and sand it off.

Finally, here's the painted shield --


It worked for me :)

I'm gonna go out of topic for a while and notice the paint on the shield. I used Tamiya's acrylic paints for this one, specifically Chrome Silver for the middle part. I've observed that it contains glitter-like material... which makes the finish look cheesy. It's good if you're modding your Gunpla for the prom to get some disco action, but in all seriousness -- it's not good.

I tried working with Tamiya's enamels on my Unicorn (I'm gonna post the WIP soon) and the enamel Chrome Silver doesn't contain any of that glittery stuff.

More on this acrylic and enamel metallic comparison when I get time to kill in the future. But for now, I'm sticking to enamels when doing some metallic painting... unless I get some GSI super metallics. :)

Monday, June 23, 2008

WIP II - NG 1/100 Gundam Exia

Although it is not yet finished (completion is around 75% as of this writing), I took a few snaps of my Exia to see how Tamiya metallic acrylics would look like once photographed.

The outcome...


From the back, the Exia looks bulkier. Hmmmm....

One particular shot was kinda underexposed so I decided to play with it a bit...


So many things left to do for this particular kit -- prime and paint the weapons, re-paint the green thingies (GN drives, etc) with acrylics, put water-slide decals, and hopefully mod the hip joints as they are virtually worthless.

Thursday, June 05, 2008

WIP - 1/100 NG Gundam Exia

Here's the deal: I got back into building my Gundam Exia. I still like the all-white color-way as a by-product of my priming the kit with Tamiya's white Surface Primer, however, a metallic Exia kept nagging at the back of my head. Biting the bullet, I went ahead and decided to do it. Here are the results...


Sticking loosely to the original color-way, I used metallic paints instead of the usual pastel-like hues. I still haven't AB'd the internal frame of the arms yet, as you can see in the first pic. I'm gonna paint it (the frame) in the same color as the internal frame for the legs (second pic).

Sigh... so many things yet to be done: painting the head, shaving the V-fins and shoulder fins, priming and painting its weapons... still a very long way to go! LOL! =D

LinkWithin

Related Posts Plugin for WordPress, Blogger...