

Showing posts with label photography. Show all posts
Showing posts with label photography. Show all posts
Monday, April 04, 2011
Friday, October 23, 2009
Screamer's Visayan island fly-by
I've had a few minutes (15 actually) of spare time the other day and I fumbled about thinking what better to do among these choices:
I've always been wowed by shots of fighter jets as they are cutting through the Earth's atmosphere. Whether their backgrounds are of the sky (as these machines are photographed from the side or underneath), or the sea/land as their flight is captured from above their position, I'm sold.
I particularly have a soft-spot for my all-time fave, the Navy's F-14 Tomcat; and a couple of others -- the F-15 Eagle and the F-22 Raptor.
Let me get this straight -- no, I don't get a boner just by looking at military planes (like Michael Bay.)
Explaining why the Tomcat's my "ultimate fighter plane" is easy -- Macross. Roy Fokker's Valks always had the Jolly Roger marking on their tails. The VF-1S also has vari-angle wings. Besides, it's been an impossible childhood dream of mine to at least get into an F-14's cockpit and maybe let some top gun fly me around.
The F-15 Eagle and the F-22 Raptor reasoning also comes easy -- Starscream.
Ok then, I searched in my photo bank for pictures of my Masterpiece Starscream and a viable background.
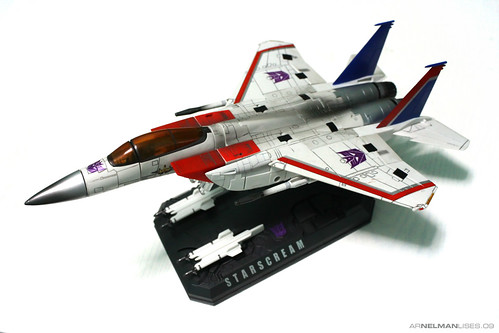

This was what I came up with, a good quarter of an hour later --

I just added condensation trails from the tips of his wing to add more spunk. Adding afterburner flames would take me about 5 minutes more so I decided against it. :)
- Continue reading Michael Schumacher's bio, The Whole Story
- Continue playing Gran Turismo on my PSP
- Revive a couple of photos I've taken before and do something creative using Photoshop
I've always been wowed by shots of fighter jets as they are cutting through the Earth's atmosphere. Whether their backgrounds are of the sky (as these machines are photographed from the side or underneath), or the sea/land as their flight is captured from above their position, I'm sold.
I particularly have a soft-spot for my all-time fave, the Navy's F-14 Tomcat; and a couple of others -- the F-15 Eagle and the F-22 Raptor.
Let me get this straight -- no, I don't get a boner just by looking at military planes (like Michael Bay.)
Explaining why the Tomcat's my "ultimate fighter plane" is easy -- Macross. Roy Fokker's Valks always had the Jolly Roger marking on their tails. The VF-1S also has vari-angle wings. Besides, it's been an impossible childhood dream of mine to at least get into an F-14's cockpit and maybe let some top gun fly me around.
The F-15 Eagle and the F-22 Raptor reasoning also comes easy -- Starscream.
Ok then, I searched in my photo bank for pictures of my Masterpiece Starscream and a viable background.
The Screamer pic I used was very similar to this one that I posted on my Flickr stream.
An island photo I used for the background.
I took this photo of an island in the Visayas shortly after takeoff during one of our flights back to Manila from Boracay.
I took this photo of an island in the Visayas shortly after takeoff during one of our flights back to Manila from Boracay.
This was what I came up with, a good quarter of an hour later --
I just added condensation trails from the tips of his wing to add more spunk. Adding afterburner flames would take me about 5 minutes more so I decided against it. :)
Friday, September 04, 2009
Another way to lazily light your figures
Here's another lighting setup that I use if I'm not that lazy in putting up the lamps when I'm shooting my toys.
This time I'm using a dark background and two 23-watt fluorescent lamps to capture the Volt Bomber's profile.

A black board was utilized as the platform and background, while the two lamps were placed on both sides. The one on the left was placed slightly above the Lander, while the one on the right was level with the toy.
Copy papers were used to diffuse the direct light coming from the lamps. This was necessary to eliminate the harsh lights and to keep the highlights from being blown up.
Finally, since I do not have barn-doors (metal flaps that allow you to prevent the light from a certain area) two more boards were used to block the lights from spilling over to the background*.
You can click on the image of the setup above to view the complete notes.
Oh yeah, the result --

* I know, I should have taken comparison shots to clearly show what the heck I'm talking about when I talk about harsh lights or blown highlights. Promise, I'll do that next time. ^_^
This time I'm using a dark background and two 23-watt fluorescent lamps to capture the Volt Bomber's profile.
A black board was utilized as the platform and background, while the two lamps were placed on both sides. The one on the left was placed slightly above the Lander, while the one on the right was level with the toy.
Copy papers were used to diffuse the direct light coming from the lamps. This was necessary to eliminate the harsh lights and to keep the highlights from being blown up.
Finally, since I do not have barn-doors (metal flaps that allow you to prevent the light from a certain area) two more boards were used to block the lights from spilling over to the background*.
You can click on the image of the setup above to view the complete notes.
Oh yeah, the result --
* I know, I should have taken comparison shots to clearly show what the heck I'm talking about when I talk about harsh lights or blown highlights. Promise, I'll do that next time. ^_^
Wednesday, September 02, 2009
How to lazily light your figures
Lazily. That's the operative word for this guide.
If you can't afford (or haven't bought) a decent lighting setup yet, then I guess this is also the guide for you.
In other words, this is a cheap solution in setting up your figures for a decent photo.
This is the setup I almost always use when I do not want to bother arranging lamps and other stuff for about 20 minutes just to take an image. Yes, lazy.
Here are the things you'll need:
I'll skip the narratives on how to set this up and just show the pic --

For the complete notes, just click on the image above.
Here's the result --
By the way, secure the lamp and aluminum rods safely to the boxes on the left and the right. I made the mistake of not fastening them at all. As I was adjusting the background for a different angle, the lamp fell and broke into a gazillion pieces. That happened within an hour of taking the photo above. Oh well, great luck!
If you can't afford (or haven't bought) a decent lighting setup yet, then I guess this is also the guide for you.
In other words, this is a cheap solution in setting up your figures for a decent photo.
This is the setup I almost always use when I do not want to bother arranging lamps and other stuff for about 20 minutes just to take an image. Yes, lazy.
Here are the things you'll need:
- A table where you're going to set your lights up. If don't have a free table around, you can use the floor. Just be prepared to lie on your stomach for quite a bit.
- A bristol board or any large sheet of paper (you can use cloth/textile) to use as the base and background of your figure.
- A 32-watt fluorescent lamp.
- A couple of rods.
- A couple of boards or large boxes to serve as light reflectors.
I'll skip the narratives on how to set this up and just show the pic --
For the complete notes, just click on the image above.
Here's the result --
By the way, secure the lamp and aluminum rods safely to the boxes on the left and the right. I made the mistake of not fastening them at all. As I was adjusting the background for a different angle, the lamp fell and broke into a gazillion pieces. That happened within an hour of taking the photo above. Oh well, great luck!
Friday, February 13, 2009
My Gundams in Flickr's
Flickr is what I use to host all of my images and Flickr has this thing called Interestingness which "shows the most awesome content on Flickr".
These are my two Gundams that have are currently in the Interestingness thingie
 My primed-white Exia, and
 my metallic SD RX-78-2
Flickr people are into Gundams, too! ^_^
These are my two Gundams that have are currently in the Interestingness thingie
My primed-white Exia, andmy metallic SD RX-78-2Flickr people are into Gundams, too! ^_^
Tuesday, September 02, 2008
1991 NBA Finals

This is definitely one of my can't-resist-to-take-a-snap moments.
I was caught riding the metro again and I looked down to see these two Chuck-wearing-dudes.
One was wearing the Chicago Bulls colorway, while the other one was wearing the Los Angeles Lakers colorway.
Can you say "1991 NBA Finals?" The first for His Airness and the last for Mr. Showtime. And who could forget Marv Albert's "Oh, a spectacular move...by Michael Jordan"?
Now, at this time and age, what could be the possibility of encountering two Chucksters wearing Mike and Magic's team colors only a meter apart?
I just hoped that both their shoes could fit the frame of my cellular phone's cam.
It did... and it made me take another look at my NBA Dynasties (Chicago Bulls) DVD set later that night.
Thursday, January 05, 2006
Canon Powershot S2 IS and Mercury
Finally, after weeks of reading (and re-reading) a number of reputable reviews, hundreds of owner comments, and thousands (ok, maybe I'm a bit over-reacting) of posts from different forums -- I bought one.
Yup. I got myself an S2 as a Christmas present, along with a 1G SD card, four pieces of 2500mAH rechargables, a Lowepro bag, and a Vivitar tripod.
Man, I was pointing and clicking away! Shooting at this and that! I was literally shooting at the moon and admiring how this camera is able to capture in exceptional clarity -- moon craters! The shots taken were almost immaculate, to say the least!
Thus, the next plans were set -- buy a lens adapter AND telephoto lens. Such joy!
Then, last night, I decided to bring my S2 out and take my dose of nightshots (hey, I HAD to shoot at something at least once a day), mounted the ultra-zoom beauty onto the Vivitar and aimed for the nighttime sky.
I was zooming in for Venus when I noticed on my viewfinder an adjacent reddish star on its left. Mercury? I looked up. Nothing but darkness was on Venus' left. I looked on my viewfinder again, Mercury was still there. I zoomed out to max wideangle. Still, Mercury was there on the viewfinder! Again, I looked up! Darkness, still.
Crap. I took about ten shots. Downloaded the buggers in my PC, and there it was. "Mercury" in all his glory. "Mercury" seems to be in a playful mood tonight coz no matter where I point my S2, there he was. Zoom in, he's there. Zoom out, still there. Put the lens cap on the extended barrel and shoot, yup, "Mercury" is still there.
"Mercury" wasn't there before in my moon-shots. As I've said earlier, those shots were short of being immaculate.
Of course, as you may now know, my S2 has a stuck pixel on the CCD. Although it's constantly there, it won't show in the prints.
So what am I ranting at??? It's pretty friggin' annoying! Shooting with this red pixel perennially on my VF!
I can't wait to try it on video... I think it would be like having a laser pointing to the right of my subjects!
I just hope "Mercury" goes away and rots in hell. Oh joy.
Subscribe to:
Posts (Atom)