Showing posts with label post-processing. Show all posts

Friday, October 30, 2009

NelMan's Way

06_sidebyside

Nothing much... I just processed some previous uploads to try and make them more cartoon-ish.

This was the description I laid out for newly uploaded photos on my Flickr account a few days ago.

I didn't expect that they would be warmly received by my contacts (thank you so much, guys!) and that some were curious on how I did it. I guess I succeeded quite a bit on my quoted objective above. :)

The offspring of those requests is this hastily prepared tutorial. :)

By the way, I'm using Adobe Photoshop CS3 with third-party plugins from LucisArt and Redfield. So I would assume that you have at least a bit of knowledge about Photoshop (layers, adjustment layers, etc.) to tackle this one... and of course, the two plugins.

Ok here we go.

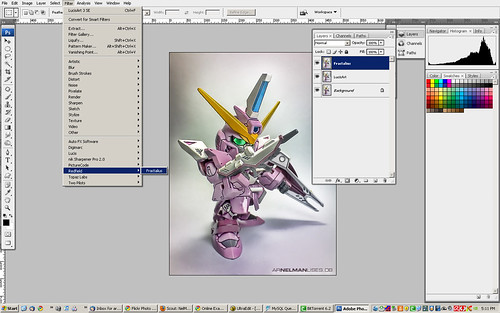
1. First up, open your image.

SD Justice Gundam

I'll be using a photo of my SD Justice Gundam for this tutorial. Pardon me if the picture quality is not up to par -- I took this photo with my cellular phone's 2MP cam. ^_^

The image is gonna be your background layer.

b03_original

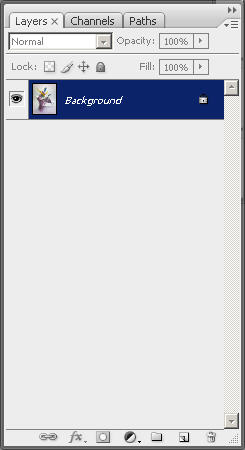
2. Duplicate this layer by pressing Ctrl + J (Command + J on the Mac.)

Name the duplicate layer "LucisArt."

b02_lucis_100

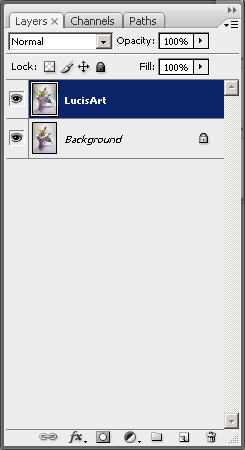
This is the layer where you will apply the LucisArt plugin.

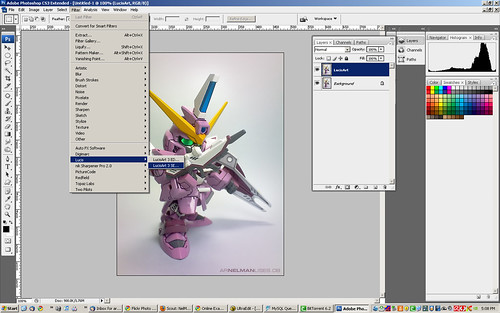
3. Go to the Filter Menu, Lucis, and click on LucisArt 3 SE.

a00_lucis_menu_loc

On the LucisArt dialog box, use these settings:
  • Style dropdown: Sculpture
  • Smooth Detail: 3
  • Mix With Original Image: 50
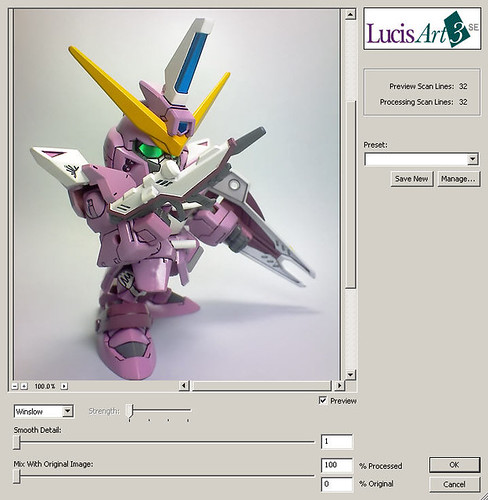
a02a_lucis_dialog

Click OK.

You should arrive at something like this --

01_lucisd_image

4. Duplicate this layer (LucisArt) by pressing Ctrl + J (Command + J on the Mac.)

Name this layer "Fractalius."

b00_fractalius_100

This is the layer where you will apply the Fractalius Plugin.

5. Go to the Filter Menu, Redfield, and click on Fractalius.

a02_fractalius_menu

On the Fractalius dialog, choose Sketch B W 01 from the dropdown box and click on the green check icon.

a03_fractalius_dialog

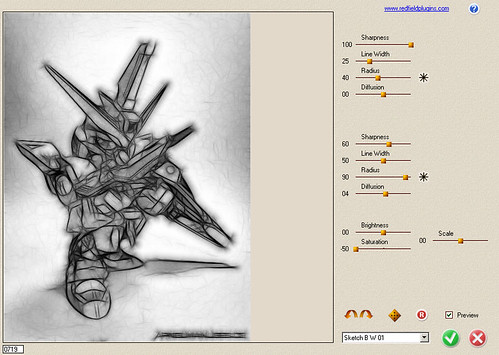
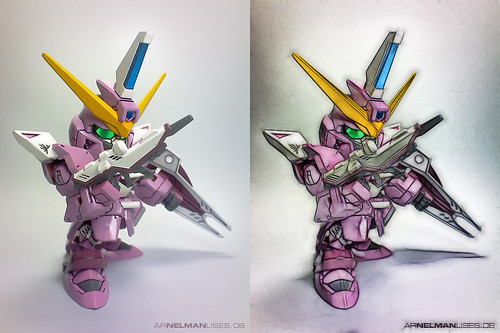
You should get something like this --

02_fractaliusd_image

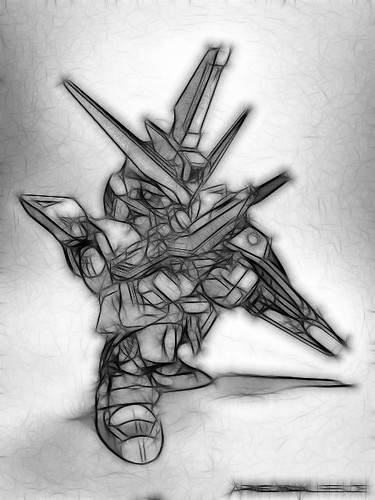
6. Select the Fractalius layer, and set its opacity to 50%.

b01_fractalius_50

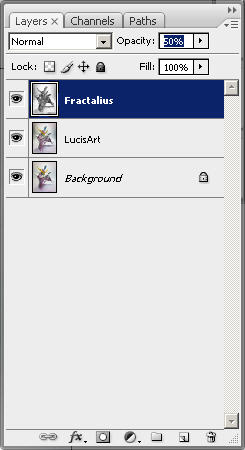
You should now have something like this --

03_opacity_50

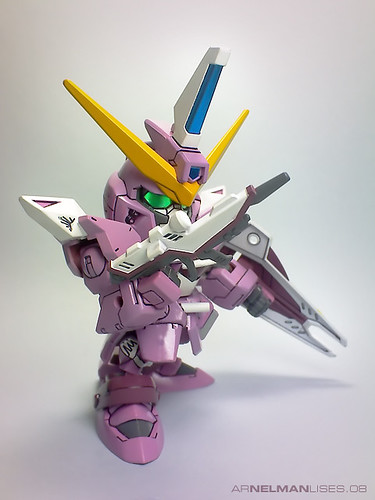
Not bad 'eh? However, the colors are a bit pale, so you might want to bump the saturation and the contrast up slightly.

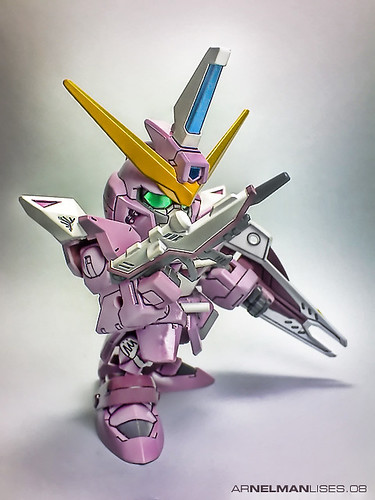
I just added a couple of adjustment layers (for saturation and contrast) to make the colors pop out better, and here's the final image --

05_final
+50 on the saturation and added medium contrast

You might want to play around with the opacities of the different layers to alter the result of your image from the one you see above, and you can also play with the different plugin settings to see which one suits your image best.

Remember that, as with other effects, this one would not make every photo as you would want them to be. So you may have to experiment a bit on the type of images you may want to apply this style to.

I don't know what to call this method of processing yet... or whether it was done before using the two plugins (if so, tell me)... hmmmmm... OK, I'll just call it NelMan's Way, and you call it NelMan's Way too! ^_^

By the way, if you find the LucisArt plugin to be more on the expensive side, you can try Topaz Adjust.

Check out my Flickr to see other images processed with this method.

Friday, October 23, 2009

Screamer's Visayan island fly-by

I've had a few minutes (15 actually) of spare time the other day and I fumbled about thinking what better to do among these choices:
  • Continue reading Michael Schumacher's bio, The Whole Story
  • Continue playing Gran Turismo on my PSP
  • Revive a couple of photos I've taken before and do something creative using Photoshop
I decided to forego the first two options and give the third one a go.

I've always been wowed by shots of fighter jets as they are cutting through the Earth's atmosphere. Whether their backgrounds are of the sky (as these machines are photographed from the side or underneath), or the sea/land as their flight is captured from above their position, I'm sold.

I particularly have a soft-spot for my all-time fave, the Navy's F-14 Tomcat; and a couple of others -- the F-15 Eagle and the F-22 Raptor.

Let me get this straight -- no, I don't get a boner just by looking at military planes (like Michael Bay.)

Explaining why the Tomcat's my "ultimate fighter plane" is easy -- Macross. Roy Fokker's Valks always had the Jolly Roger marking on their tails. The VF-1S also has vari-angle wings. Besides, it's been an impossible childhood dream of mine to at least get into an F-14's cockpit and maybe let some top gun fly me around.

The F-15 Eagle and the F-22 Raptor reasoning also comes easy -- Starscream.

Ok then, I searched in my photo bank for pictures of my Masterpiece Starscream and a viable background.

Decepticon air commander
The Screamer pic I used was very similar to this one that I posted on my Flickr stream.

The Island
An island photo I used for the background.
I took this photo of an island in the Visayas shortly after takeoff during one of our flights back to Manila from Boracay.

This was what I came up with, a good quarter of an hour later --

Island fly-by

I just added condensation trails from the tips of his wing to add more spunk. Adding afterburner flames would take me about 5 minutes more so I decided against it. :)

Friday, September 12, 2008

A snowball by Roy Fokker


Here's a little secret -- I have always been a fan of Macross. Ever since I saw the first episode of Macross/Robotech in local television back in the 80's, I was hooked. There I was, a kid so amazed at these fine machines that I couldn't wait for the next episode to be shown. Unfortunately, I was not able to finish the entire series. For one reason or another (I was probably out, playing in the streets), I just wasn't able to witness what had happened.

In fact, I was only able to watch the entire series a little more than six months ago. Seeing the Valks turn into Gerwalks and Battroids again was just like a dream. As far as I'm concerned, I can only describe the fact of finally being able to finish the series in one word -- snowball. A snowball rolling down from an imaginary mountain with unfathomable height.

I would like to thank Roy Fokker for that snowball. Sure there was Rick (Hunter), his protege... and who could forget Max, who is perhaps the most skilled person ever to sit on a VF (Alto-kun's quickly gaining ground on this one). But Roy... he was a bad-a$$! The poor bastard died and fell a few episodes too short, I know. But you've gotta admit -- he's DA MAN!!!

His VFs? The VF-xS? Second to none. Equal only to Roy. The Skull. Jolly Rogers. The Tomcat lineage. Perfect. The VF-1S is wicked... but the VF-0S he used in 'Zero is my all-time fave Valk... and I don't need a particular reason to explain why. It just is.

It's his VF that started my snowball. Thanks to the VF-1S, I am now into Gundams too, as you may know very well by now... and pretty soon, hopefully, I'll be showing some DC Direct figures. That frikkin' snowball's starting to burn holes in my pockets! ^_^

Aaaaaanyway, I made the image composite above as, well, sort of an homage to the Skull squadron leader. I took a pic of my Revoltech VF-1S and laid it on top of a coupl'a images -- a CGI planet and one of Hubble's pics. Boy, was I surprised by the reaction it got (and is still getting) on Flickr. I never knew so many people were/are Macross junkies! Robotech forever! ^_^

With the advent of Alto's VF-25 (soon to be released by Bandai on the 18th of the current month, September), I just found it fitting to share the image with you guys. And yes, you can click on it for a slightly larger image. :)

Have a great weekend ahead! :)

LinkWithin

Related Posts Plugin for WordPress, Blogger...