Wednesday, August 27, 2008

Cagalli in her birthday suit... err, and her mobile suit

Remember Cagalli Yulla Attha? Orb's princess who was a strong-willed character in Seed, but became a crying, whining wuss in Seed Destiny?

No matter what I, nor anybody, may think, Cagalli is still my favorite lady in all of Gundamlore! Ditto with her mobile suit, the MBF-02 Strike Rouge.

After being side-stepped by the Unicorn Gundam in my purchases and kit-building, Red has finally been taken out of the backlogs stack and prepped for construction.

Here are some snaps...


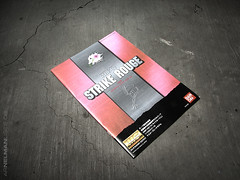
The box is of the average MG kit -- not as big as the Hi-Nu's nor the Sazabi's, and not as small as the RX-78s.


Unless you're already used to building Strike variants, you will need this -- the instruction manual. The instructions are in Japanese but are Lego-like... so no need to fret.


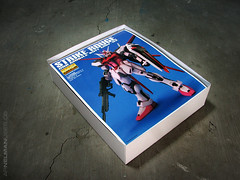
Just like the other older MGs, Bandai included a poster of the Strike Rouge.

Sidenote: How I wish that Bandai would again incorporate posters of the mobile suits in its MG kits... which may be far-fetched since our beloved Bandai is reportedly cost-cutting. :(


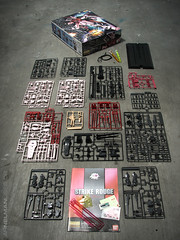
Lastly, the box contents -- fifteen trees (including the one for the launch pad), a launch pad, a wire, the instruction manual, foil stickers, decal stickers and dry-transfer decals. The two pens are freebies from my favorite place of hanging out -- Great Toys in Greenhills. ^_^

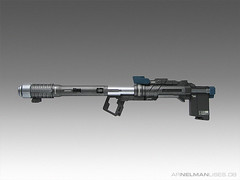
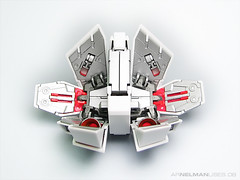
With the exception of their colorways, the MBF-02 Strike Rouge is exactly the same as the GAT-X105 Aile Strike Gundam. Speaking of colorways, I find the pinks on the Rouge a bit less menacing so I'm thinking about changing it up a bit.

I started building the kit last night... and, Cagalli and the Rouge being my fave gal and MS, I was very meticulous to the point of being a person with OCD! LOL!

WIPs soon!

Siblings of desctruction

I was kinda fooled into thinking that the Unicorn Gundam's weapons would be composed of only a few bits and pieces... again, I was proven wrong. Inheriting the traits and complexity of its owner, these bad boys were as compound as the white beast. I must note that they required the same attention in every facet... perhaps more... which is a very good sign for hobbyists.


First up is the... hmmmmm... some call it the Beam Rifle, but the instruction manual calls it the Beam Magnum. The details on it are just crazy... you can paint-mod it to infinity! If I've had more time on my hands (which I do not have), I'd probably paint more silver and blue to make it pop out more. ^_^


Now here's a HUGE piece of hardware -- the Hyper Bazooka. It's as tall as the Unicorn itself (I think) when it's extended, as in the image above! Want details? Don't worry, like its sibling, it doesn't disappoint.

Finally, there's the Gattling gun, which comes as a freebie in the Unicorn mangas. I don't have them... yet! They're quite hard, if not impossible, to outsource these days. :(

Anyway, the obligatory, all-angles-covered photoshoot for the Unie would probably come out the next few days.

Thursday, August 21, 2008

Preview - Unicorn Gundam

Manhours, manhours, lotsa patience, and more manhours. Dang! I knew the Unicorn Gundam would be a challenge to build considering the number of its parts, but I never expected the amount of gate-nipping, sanding, painting and decal-setting it took to build this Katoki produce!

Aside from the hundreds of parts,there was like, a thousand decals to set from the water-slide made by Bandai for this MG.

Ok, maybe I was just exaggerating on the decal bit... but I hope you get what I mean.

Here's a preview before I get to the full-blown obligatory all-angles-covered shoot --

Tuesday, August 12, 2008

MG Infinite Justice - Athrun finally gets one

Amuro's got tons of 'em. So does Char. Kira and Shinn have their share. Heck, even my fave Cagalli has got one!

I wonder why it took Bandai ages (literally) to come up with a mobile suit for Athrun, who is arguably one of the most loved protagonist in the Seed/Seed Destiny series. Fan service or not, our beloved Bandai will finally give Athrun his due.

The final piece to the Athrun MG puzzle may have come from the recent promotional video for the MG Force Impulse, wherein the last part of the video showed a screen carrying the colors of the Justice/Infinite Justice... and it seems as though everyone in Gundamland knew, or had at least a feeling, that this is it! The Justice will finally come to town!

A few weeks, and MG releases (including the scale-challenged Shin Musha) later, this was found on GA Graphic --


Time to bring out the champagne glasses! Athrun Zala, Infinite Justice... ikkimasu!!!

Sidenote: I wonder when the Legend will come out... hmmmmm...

Edit: Gunota lists the MG Infinite Justice and states that it will come out in October!

Monday, August 11, 2008

Upskirt

Here's a small work-in-progress, after weeks of airbrushing the internals... why does it take me so long? Don't ask. ^_^


I'm giving you three guesses to get this Gundam's name.

The paint used were Chrome Silver and Gun Metal, all enamels from Tamiya.

For the boosters (well, they can't be seen much in this image), I used Tamiya Acrylics... namely -- Yellow, Orange, and Red.

Decal work is what I'm currently into right now for this model, so I guess it'll take around a week or so before I get the body done... yes I know... I'm such a slow-poke... buy hey, I gotta work in order to get kits like this, right?

After which I can then proceed with the weapons and the shield.

On a final note, remember my post about the glittery stuff in Tamiya Acrylics? As I've mentioned, the enamel version of Tamiya's Chrome Silver doesn't have any glittery effect. Can you see any in the image posted above?

Tuesday, August 05, 2008

Poor man's modeling - Neb kit hose hack

So you want to buy an airbrush but don't have enough moolah (yet) to buy a hobby compressor and all you've got around the house is a nebulizer... well, here's a hack you might want to consider.

Things you need:
A. Nebulizer kit
B. GSI Creos' One-Touch Plug for Mr. One-Touch Hose 1/8 S
C. Scissors (or your hobby knife)
D. Airbrush (this hack is useless without it)


I strongly suggest that you do not hack the original kit that came with the nebulizer.

1. Get a nebulizer kit from a nearby pharmacy/drugstore. It doesn't matter if you get the one for kids or for adults... all you need (for now) is the hose. Another important thing to consider is try to purchase the kit without ridges/channels on the inner wall of the hose.

2. Get a scissor and cut away the hose's adapter. Be careful. You wouldn't enjoy this hack a few minutes later if you've got a lacerated finger.

3. Get one of the two One-touch plugs from its packaging. These plugs come in two. Why two? Well it allows you to quickly switch between two airbrushes without ever removing either plug. It retails at around US$9.24. These plugs will fit Tamiya HG and Badger airbrushes. But please don't take my word for it... yet. Go to your local hobby shop and bring your airbush with you in order to verify that it does indeed fit.

4. Insert the One-touch plug at the end of the hose you've just cut. Connect the plug to your airbrush and connect the other end of the hose to the nebulizer.

Kudos! That's all there is to it!

BTW, nebulizers blow more air (around 20 liters-per-minute) than your hobby-grade compressors, which let air out at around 15psi. Helpful math-wizards out there reading this, kindly help me out and send me the computation from liters-per-minute of air to PSI (if there's such a thing).

For this reason you might want to buy a bleeder valve, which is available at pet stores. They are used for aquarium air supply hoses.

More on the bleeder valve hack in the future.

Note for purists: Hobby-grade compressors are still the best when it comes to airbrushing. Once you save up for one, get it.

Happy airbrushing!

Monday, August 04, 2008

Of cement and glitters

I broke part of the Exia's shield sometime ago (March 9, 2008), I think. I don't know... maybe I was just too lazy and too careless when I tried to pry it out.

Praaacck! My fiancee, who was a few yards away heard it and said, "Awwww... something broke, right?" I gave no response as she followed with, "There goes the kit I gave you." with a smile on her face.

Here's the shield thingie that broke --


It's a good thing that I've got Tamiya Cement around. It's perfect when you screw up and go Herculean on something like your styrene kits. It bonds styrene by basically melting the part that it touches.

I can only vouch for it working properly on styrene, though. It wouldn't work on ABS plastic. Don't ask. Tamiya Cement just doesn't work that well (if at all) with ABS plastic.

You can use LCA or super glue, of course. Admittedly, LCA would bond the severed parts like crazy. The problem with it, however, is that it would also render the affected plastic VERY brittle. You could end up with more problems than the one you've started with.

Here's how Tamiya Cement goes -- brush the cement thinly on the affected areas and put them together again by squeezing. If you see excess cement oozing with what seems like melting plastic, don't fret. It's the way the cement should work.

Put the plastic in a safe place and leave it there for, say, 12 hours. Too much curing time is definitely better than having it cure incompletely. In my case, I checked on it a full 24 hours later.

Here's how it looked after applying the paint and squeezing the parts --


Notice the excess cement? Now, it's time for some elbow grease and sand it off.

Finally, here's the painted shield --


It worked for me :)

I'm gonna go out of topic for a while and notice the paint on the shield. I used Tamiya's acrylic paints for this one, specifically Chrome Silver for the middle part. I've observed that it contains glitter-like material... which makes the finish look cheesy. It's good if you're modding your Gunpla for the prom to get some disco action, but in all seriousness -- it's not good.

I tried working with Tamiya's enamels on my Unicorn (I'm gonna post the WIP soon) and the enamel Chrome Silver doesn't contain any of that glittery stuff.

More on this acrylic and enamel metallic comparison when I get time to kill in the future. But for now, I'm sticking to enamels when doing some metallic painting... unless I get some GSI super metallics. :)

LinkWithin

Related Posts Plugin for WordPress, Blogger...